¶ Meshmerize with Cellular Extension
The cellular extension gives Meshmerize the ability to expand the WiFi mesh by being able to equally use cellular links within the network. This allows nodes with a cellular modem to participate in the mesh. For Meshmerize to be able to send packets over the client's cellular link, a Meshmerize server instance installed behind the radio access network is required to serve as a communication endpoint for the client. For most deployments, this instance usually is a Meshmerize service running on the Meshmerize cloud server. However, if you operate or have access to your cellular network (e.g. campus network), you can deploy your own Meshmerize server instance.
Each Meshmerize node needs to add the public IP address of the server - the Meshmerize instance is running on - as endpoint. This endpoint establishes a tunnel all meshmerize packets can be sent through to reach the Meshmerize instance over the cellular link, similar to what a VPN does. The endpoint supports IPv4 and IPv6.
The endpoint IP address will be provided by Meshmerize. If you want to configure your server instance, please contact Meshmerize for installation instructions support@meshmerize.net.
All Meshmerize nodes, including the endpoint, need static IP addresses to identify each other over the cellular extension of the the network.
¶ Overview
This document will guide you through the steps required to enable and test the cellular extension.
First, you need to decide which hardware you want to use for the cellular connection. According to this, you will have to adjust the configuration of your Meshmerize router. For the encryption, a few additional configuration changes are required. Finally, you will be guided on how to test that the cellular extension is working.
By the end of this guide, your Meshmerize router should have be connected to the cellular network and able to reach the Meshmerize server instance via a cellular link.
¶ 1. Cellular Hardware
Only routers with access to a 5G/LTE capable interface can take advantage of the cellular extension. Your cellular interface can be in the form of one of the following options:
- built-in cellular modem
- USB-modem
- cellular router attached via LAN.
To get your cellular interface connected to the internet you need a network interface for it. This will be explained in Cellular Network Interface.
¶ 2. Configuration
The cellular extension requires four configuration steps. The following steps only target the client devices, not the server instance.
-
Every device needs a unique static IP address.
-
The static IP of the server instance is added as gateway.
-
Two additional network interfaces have to be configured.
-
A cellular network interface that enables the cellular connection to the internet (or 5G station).
-
A Meshmerize interface which utilizes the former to establish a cellular Meshmerize link.
-
-
The Meshmerize service needs to know about the cellular network interface to start the cellular extension.
¶ Static IP Address and Gateway
Every device participating in the cellular extension requires a unique static IP address within the same subnet as the one from the server instance.
You will get the subnet and the server's IP address from Meshmerize.
For the guide's sake, let's assume the subnet is 169.254.0.x/24, and the static IP of the server is 169.254.0.240.
Your device comes with a static default IP address already configured. However, this IP is generic for all devices and probably not in the correct subnet. Therefore it needs to be changed.
To do that, you can use the GUI (Graphical User Interface) of your device.
You can access your device's GUI via its default IP address.
Check the device labels or vendor information to find it.
The default IP address of MeshmerizeOS is 169.254.0.254.
In this example, the static IP does already match the desired subnet. It still needs to be changed to be unique.
From the startpage of the GUI go to Network -> Interfaces and select "Edit" for the lan interface.
Here you can change the static IP address and add the gateway.
Afterwards it should look like the edit menu shown below.
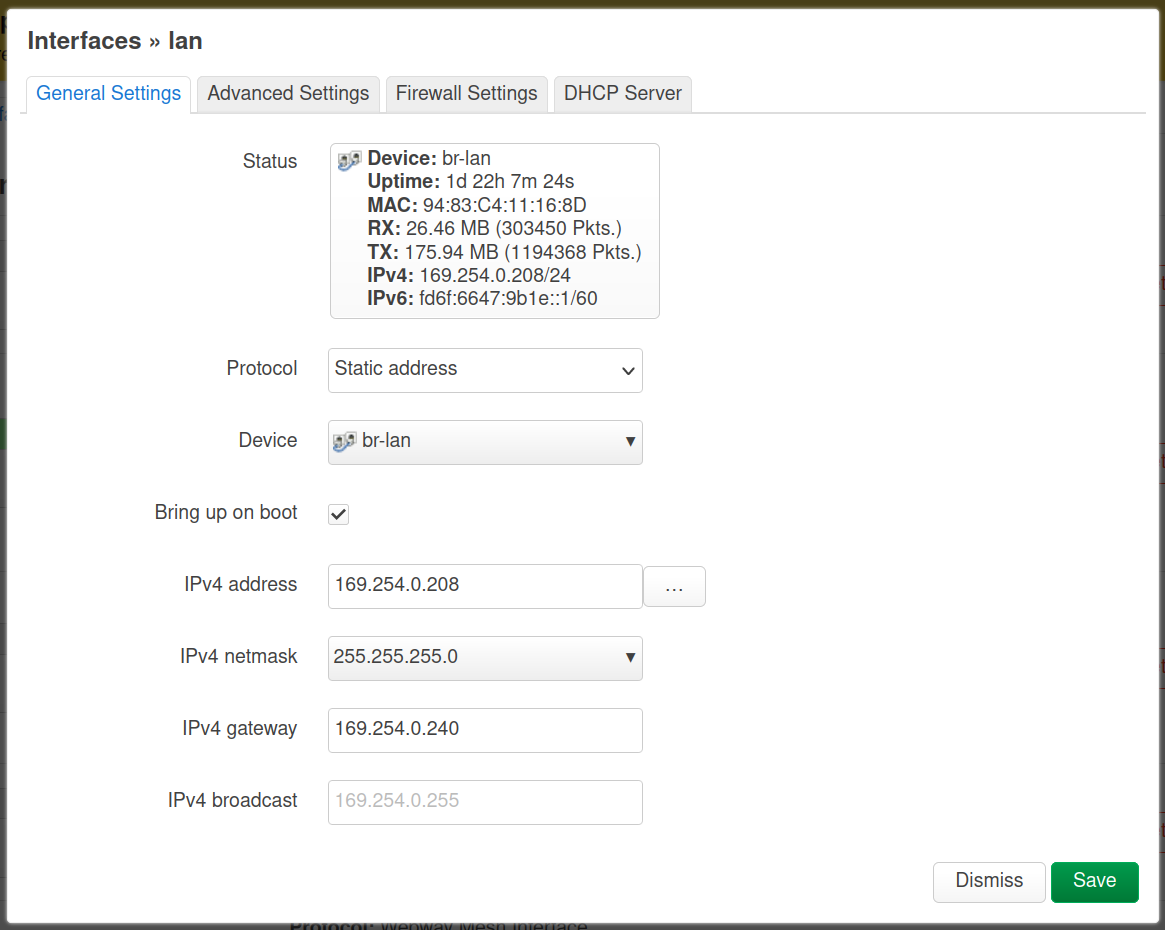
In this example, the unique static IP is 169.254.0.208.
Please select "Save" to apply these changes.
Note that with changing the static IP address you will be logged out of the GUI.
Use the new IP address to regain access to your device.
¶ Cellular Network Interface
As already mentioned, you need an additional network interface for your cellular connection. This is the cellular network interface your device is connected to the internet with. It is independent of Meshmerize.
To add this cellular network interface go to the graphical user interface (GUI) of your device. Please note that you need to use your newly changed IP address to access the GUI.
Inside the GUI, navigate to Network -> Interfaces to see the available network interfaces. Before adding a new interface check if one of the following interfaces already exist.
wwan0usb0ppp
If you see one of these you can jump to the Cellular Meshmerize Interface section. Otherwise, click "Add new interface" to create a new interface. You will get to a menu to configure the new interface. Please check out the Openwrt Documentation on how to set up a cellular interface. If you are unsure what interface configuration your modem needs, go to the Configuration Examples section. It shows cellular network configuration examples for different modem types.
Please note that the LAN-connected cellular router does not require an extra network interface. In this case, the connected ethernet port will be the "cellular" network interface. It is the simplest configuration as the drivers needed for the cellular modem to establish a connection are already managed by the cellular router. Just ensure that the connected ethernet port is not bridged. Navigate to Network -> Interfaces and select the Devices Tab. You should see the list of available devices as shown below.
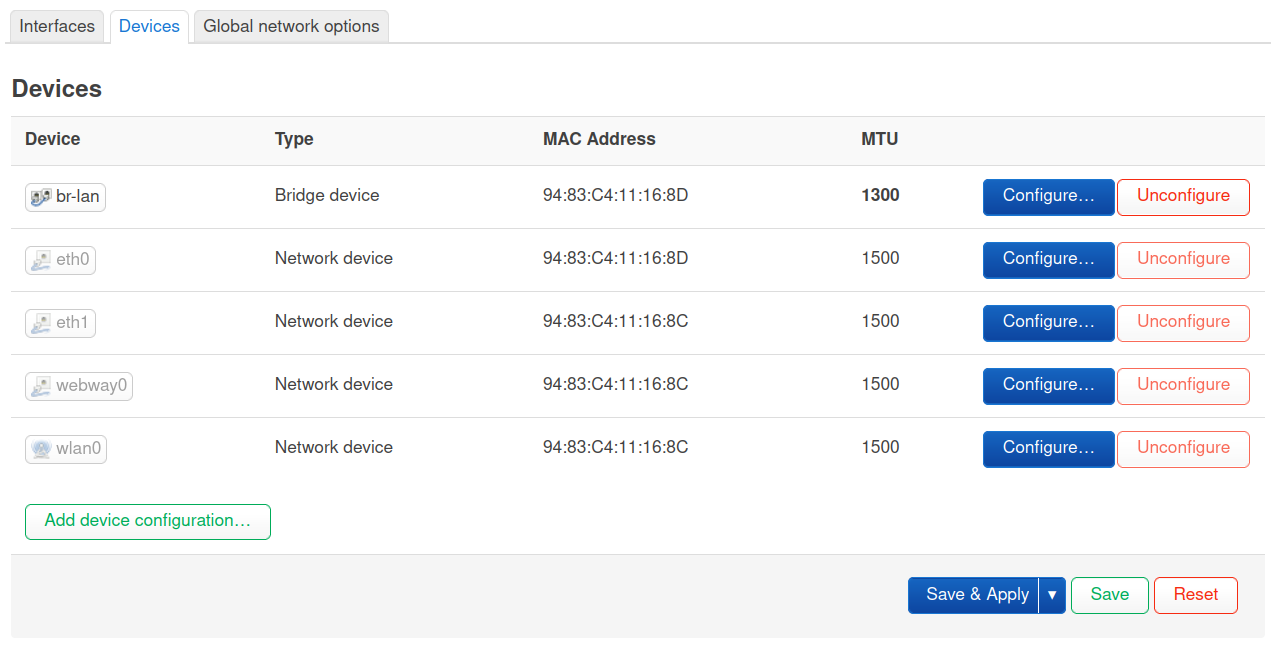
Next to the br-lan device click on "Configure" to get to the following configuration menu.
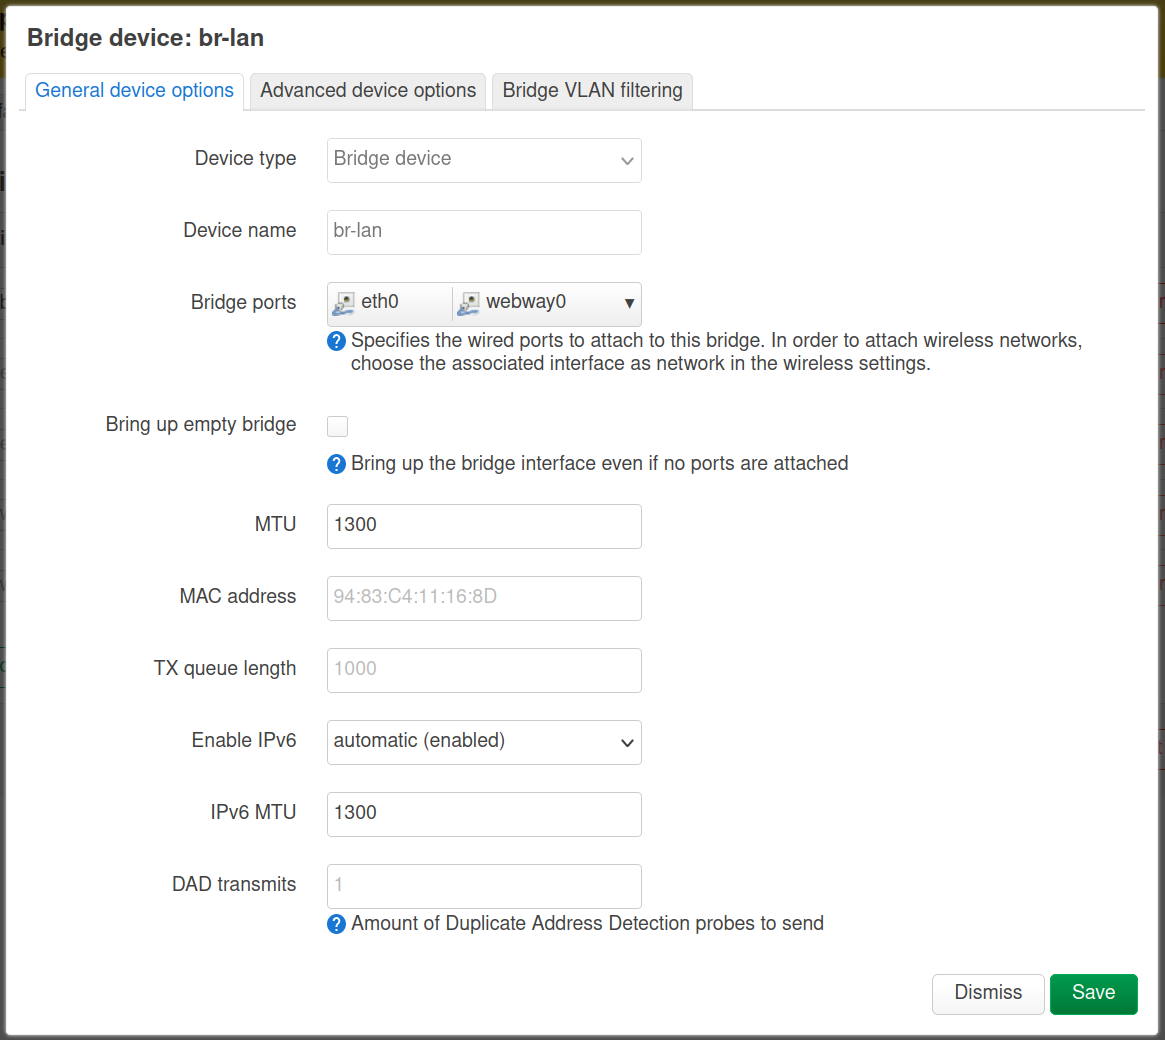
All bridged interfaces are listed under "Bridge ports". Ensure that the ethernet interface, which your router is connected to, is not part of this list. If it is, you need to remove it. To do that just click on the dropdown and deselect the interface you don't want inside the bridge. Click "Save" and you successfully removed the interface from the bridge.
¶ Cellular Meshmerize Interface
For the cellular Meshmerize link, an additional Meshmerize interface needs to be added to the network configuration.
This so-called meshwwan0 config describes which device and endpoint are used for the cellular connection.
# example of a meshwwan taken from /etc/config/network
config interface 'meshwwan0'
    option proto 'wwiface'
    option webway 'webway0'
    option device 'wwan0'
    option endpoint '195.201.122.240'
- device - the cellular network interface we've added in the Cellular Network Interface section
- endpoint - the public IP address of the Meshmerize server instance. As already mentioned, this IP address will be provided by Meshmerize, unless you have your server instance. If so, use its public IP address.
The following steps will guide you through creating the example meshwwan0 interface from above.
First, login to your device's GUI, navigate to Network -> Interfaces, and click on "Add new Interface".
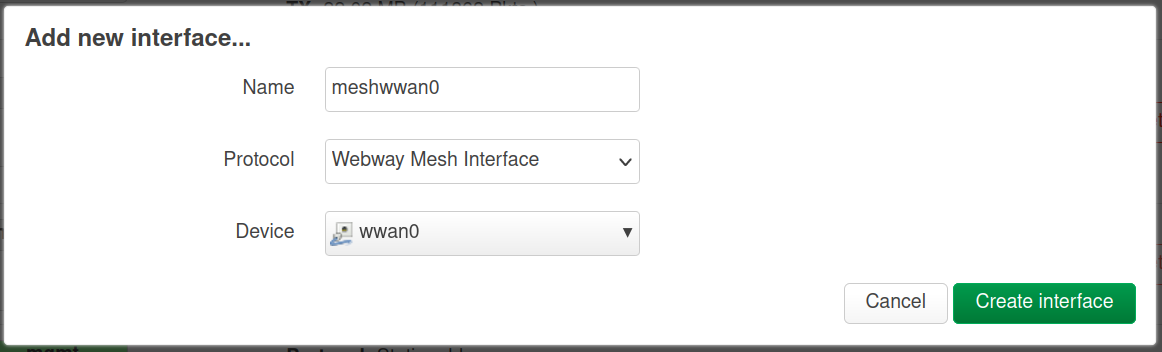
Enter "meshwwan0" (this is optional, you can name it differentyl if you want) as name and select "Webway Mesh Interfac" as protocol.
The Device should be the cellular network interface created in the Cellular Network Interface section above.
For this example, the cellular interface is wwan0.
Click on "Create interface" to get to the next configuration step shown below.
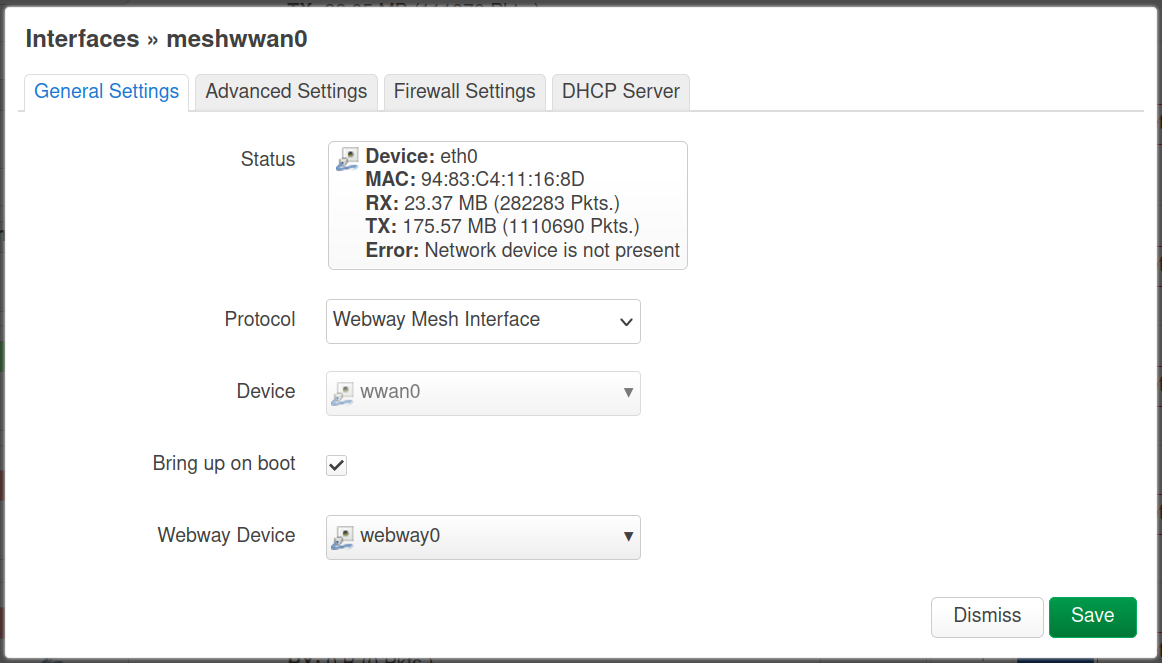
Inside this menu you need to select the Webway Device and enter the endpoint IP address. For the Webway Device, click on the dropdown menu at the bottom, and select "webway0". To enter the endpoint, you need to switch to the "Advanced Settings" tab.
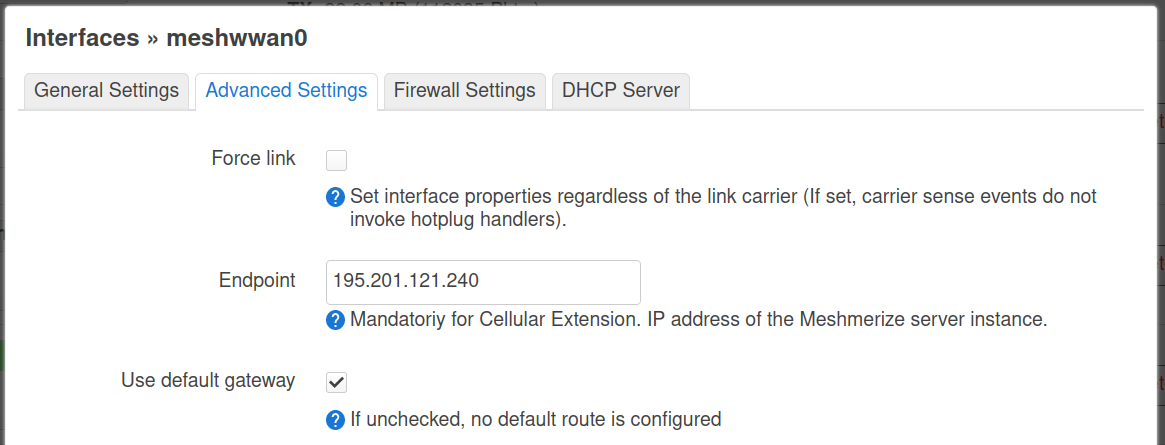
Enter the endpoint IP address. Then, go to the "Firewall Settings" and select "wan" as firewall zone for your new interface.
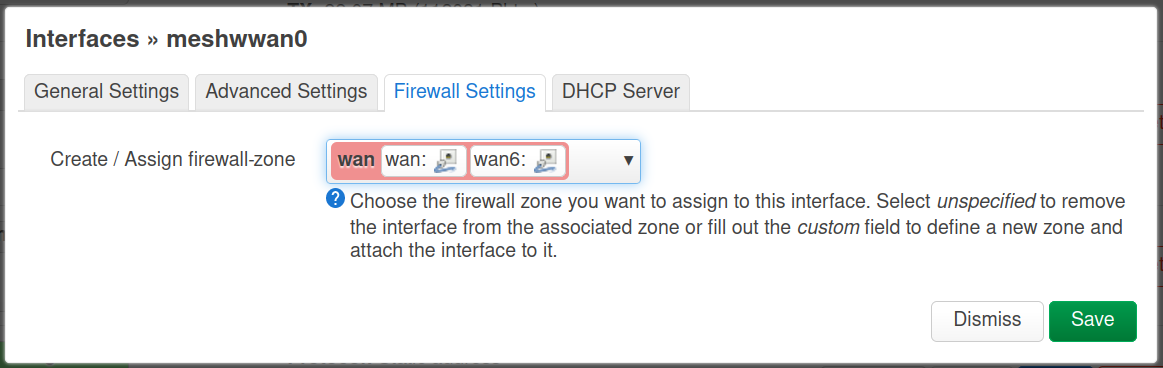
Click on "Save" to submit your changes.
This will save your changes to the network config (/etc/config/network).
Now, you have successfully created your meshwwan0 cellular Meshmerize interface.
¶ Enable Cellular Extension
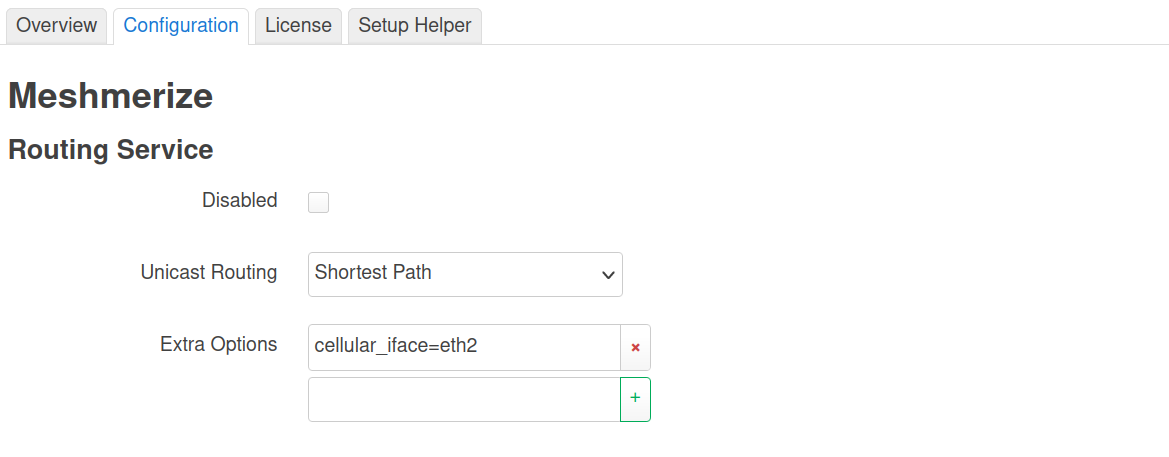
The Meshmerize service needs to be informed about the interface you want to use for the cellular extension.
You can do that by adding cellular_iface=<cellular-network-interface> as an extra option to the meshmerize config.
Again, login to the GUI of your device.
This time, navigate to Network -> Meshmerize, and click on the tab "Configuration" (it's the one next to "Overview").
Here, you should see an empty field called "Extra Options".
This is where you can add custom options for your Meshmerize service.
The extra option we want to add is the "cellular_iface".
To do that, enter 'cellular_iface=<cellular-network-interface>' inside the field and hit enter.
Please note that the interface set as cellular_iface must be the same interface you set as device inside the meshwwan0 config above.
If your cellular network interface is wwan0 it should look like the example screenshot below.
¶ 3. Encryption
The cellular extension is not encrypted by itself. We use Wireguard to encrypt the cellular link. Having the packets encrypted is not the only advantage of Wireguard. It also ensures that you can use a UDP port that your ISP does not block.
¶ Wireguard Setup
If you want to have Wireguard enabled you will get a wg.conf file for each of your devices.
Use it to add two vpn sections to your network config in /etc/config/network.
Follow the OpenWRT Wireguard guide on how to do that.
Please note that you need terminal access to your devices to follow the guide.
Use SSH to login to your device. You can do that via ssh root@<device-IP>.
To get your device-IP checkout the Static IP Address section.
You will notice that the guide shows multiple options that need to be set for Wireguard to work.
These options match the variables defined inside your wg.conf file.
Simply copy them from there.
Don't forget to add the created vpn interface to the wan firewall zone.
You can do this by either going to the GUI and editing the vpn interface, or by editing /etc/config/firewall as shown in the Firewall Example section.
Please check that the VPN is working by sending a ping to the Wireguard server IP.
You can find this IP by looking at the wg.conf file under AllowedIPs = ....
Use the first IP address of this range (e.g. 10.8.0.1) and do ping 10.8.0.1 to varify that the VPN is connected.
If the ping is not working go to the troubleshooting Wireguard Does Not Work section to get help.
¶ Meshmerize over Wireguard
To send the Meshmerize packets over the VPN you need to use the new vpn network interface instead of the cellular network interface (e.g. wwan0).
Again, you need to use ssh to access a terminal on your device.
Edit the /etc/config/network file and replace the interface set as device in your meshwwan0 config with vpn.
Also, the endpoint of the meshwwan0 needs to be changed.
It should be the IP address of your wireguard server.
You will get this IP address from Meshmerize.
Assuming the wireguard server IP is 10.8.0.1, this is how your new meshwwan0 config would look like based on the example from above.
# example of a meshwwan
config interface 'meshwwan0'
    option proto 'wwiface'
    option webway 'webway0'
    option device 'vpn'
    option endpoint '10.8.0.1'
Now, Meshmerize will use the vpn interface as the cellular interface.
As described in the Enable Cellular Extension section, you also need to set the cellular_interface option to vpn like this:
# taken from /etc/config/meshmerize
config meshmerize 'meshmerize'
    option disabled '0'
    option device 'webway0'
    ...
    list option 'cellular_iface=vpn'
¶ 4. Test Cellular Extension
Please make sure that all antennas are attached before booting your device. Especially the cellular antennas are required for modems to work. Without antennas, the cellular connection will not be established. Also, SIM cards need to be put in before boot.
After booting, the device should have a cellular connection and should automatically establish a cellular link. There are a few checks to verify that your cellular extension is working properly.
First, check that your router has a cellular connection. If that is the case, check if Meshmerize established a cellular link.
¶ Check Cellular Connection
Please access your device's GUI via its new static IP address.
If you are not sure, this is the IP address we assigned in the Static IP Address and Gateway section.
In the GUI, navigate to Network -> Interfaces to see the available network interfaces.
Here you should see either a wwan0, usb0, or ethx interface. It should have a dhcp address assigned, indicating that it has a working internet connection.
If the cellular interface did not get a dhcp address assigned, go to Troubleshooting Cellular Connection.
Before going to the next step, please make sure that your cellular connection is working.
You can do this, for example, by accessing the device via ssh root@<device IP> and sending a ping to google: ping google.com.
¶ Check Meshmerize Cellular Link
The next step is to check if Meshmerize has established a cellular link.
Access your device via ssh root@<device-IP> and enter meshmerize cellular.
The output should display at least one udp link which shows a latency in ms.
This is your cellular link to the server instance.
If you do not see any links, go to Troubleshooting Cellular Link.
¶ Technical Details
¶ Cellular Beacons
The cellular link is a UDP link. Meshmerize sends cellular beacons every 20ms to discover and uphold the cellular link. The cellular beacons are impartial from the Meshmerize Wi-Fi beacons. Each cellular beacon sent by a client consists of a timestamp. The server instance, on the other hand, sends beacons containing a timestamp and the Round-Trip-Time (RTT) for the link. The RTT is the time it takes for a packet to be sent from source to destination plus the time the destination acknowledges the packet, sending a packet back to the source - basically, a round trip. To get the RTT, the server uses the timestamp of the client beacons. The client nodes only know of the link's RTT by receiving the beacons sent by the server instance.
¶ Metric
Meshmerize uses the estimated transmission time (ETT) as a metric for its link. It is the estimated airtime of a packet sent at a certain MCS rate considering its transmission probability. Shorter airtime is better. Therefore, links with the smallest metric are considered best. UDP links are assumed as wired connections and do not have an estimated airtime. To make them assessable, they get a small default metric which gives them priority.
The cellular link should also be prioritized over Wi-Fi links, but only if its link quality is sufficient. To evaluate whether the link quality is sufficient or not, the RTT of the cellular link is used. As long as the link RTT is below a certain threshold value, the link has the same default metric as any other UDP link.
However, if the RTT surpasses the so-called cellular RTT threshold a penalty value is added to its metric. The default penalty needs to be high enough to ensure that the link is unusable compared to available Wi-Fi links. The default penalty is 10000, which is higher than the highest value the Wi-Fi metric can have. The default threshold value for the RTT is 100ms.
Both the allowed cellular RTT threshold and the penalty can be set individually. To do that you can add them as extra options to Meshmerize, as explained in the Enable Cellular Extension section. The options to set are:
cellular_rtt_threshold- max. allowd RTT for the cellular link in mscellular_penalty- value added to the default metric
¶ Configuration Examples
The following will show examples of possible network and firewall configurations.
Please note that these are taken from the /etc/config/network and /etc/config/firewall files from different devices. But the options displayed are the same as you would see using the GUI.
¶ Cellular Network Interface Examples
The following snippets show how the cellular interface config could look like depending on the utilized modem.
¶ Quectel
Quectel modems use the WWAN or the Modemmanager protocol. The apn and pincode are provided by your Internet Service Provider (ISP). The family describes what IP family you want to use. In the example, it is IPv4 only.
Built-in Quectel Modem
# Quectel wwan0 interface (taken from /etc/config/network)
config interface 'wwan0'
    option proto 'wwan'
    option auth 'none'
    option description 'Cellular'
    option family 'ipv4'
    option autoapn '0'
    option apn 'web.vodafone.de'
    option pincode 'xxxx'
    option disabled '0'
¶ Askey
The Askey modem uses the RNDIS driver. The modem becomes visible in the form of an ethernet interface. In this case eth2. As protocol it uses DHCP.
Askey USB Modem
# example for an Askey USB modem (taken from /etc/config/network)
config interface 'cellular'
    option proto 'dhcp'
    option device 'eth2'
¶ Firewall Example
All cellular interfaces and vpn interfaces need to be added to the firewall wan zone.
The following example shows the wwan0 and the vpn network interfaces added to the firewall wan zone.
# firewall wan zone example (taken from /etc/config/firewall)
config zone 'zone_1'
    option input 'ACCEPT'
    option name 'wan'
    option masq '1'
    list network 'wwan0'
    list network 'vpn'
¶ Troubleshooting
All troubleshooting is done via terminal. Please make sure that you have SSH access to your device and are logged in to a terminal. before starting with going through the troubleshooting sections.
¶ Cellular Connection
Usually, a restart of the cellular interface via the GUI already helps to re-establish a connection.
You can also check the kernel log for error messages regarding your cellular modem. Therefore, access your device via ssh and enter dmesg.
Some modem drivers get stuck and require multiple restarts of the interface to work again.
¶ Wireguard Not Connecting
You can enter wg to get a status update on your Wireguard connection.
If you don't see that a handshake was performed, something is definetly not working.
Please try to ping the endpoint of your wireguard connection.
You can find the endpoint in the output of wg as shown in the example below.
peer: <pub-key>
  preshared key: (hidden)
  endpoint: [2a01:4f8:1c1b:59b9:5757:0:1:2]:443
  allowed ips: 0.0.0.0/0, ::/0
  latest handshake: 57 seconds ago
  transfer: 6.44 MiB received, 6.44 MiB sent
In this case, you would ping 2001:4860:4860::8888.
If you can't ping the endpoint, it could be due to an IPv6 issue.
To rule this out, ping any IPv6 address, for example google: ping 2001:4860:4860::8888.
If that is working, it is not IPv6 which is causing the connection issue.
Now would be a good time to contact Meshmerize for help (support@meshmerize.net).
However, if the ping is not working, please check your network setup and your ISP before contacting Meshmerize. Especially in private 5G networks, it could be that you only get a global IPv4 address assigned. If that is the case, contact Meshmerize to find a solution for using only IPv4.
¶ Cellular Link Not Established
The first thing you can do is to check the Meshmerize logs.
Access your device via ssh and enter meshmerize log cellular.
Now you should see a rolling log printing to the console whenever a cellular beacon is sent or received.
This is how the log would look like for a working cellular link:
14:12:16.822943 cellular: link_recv_cellular from 2e:1e:61:c2:39:e3
14:12:16.849908 cellular: ev_handler_cellular_beacon_timer: send beacon on iface vpn (0)
14:12:16.850454 cellular: link_send_cellular: sent cellular tlv
14:12:16.869285 cellular: link_recv_cellular from 2e:1e:61:c2:39:e3
14:12:16.899601 cellular: ev_handler_cellular_beacon_timer: send beacon on iface vpn (0)
14:12:16.900138 cellular: link_send_cellular: sent cellular tlv
14:12:16.920368 cellular: link_recv_cellular from 2e:1e:61:c2:39:e3
14:12:16.949649 cellular: ev_handler_cellular_beacon_timer: send beacon on iface vpn (0)
14:12:16.950200 cellular: link_send_cellular: sent cellular tlv
14:12:16.965224 cellular: link_recv_cellular from 2e:1e:61:c2:39:e3
If you don't see any link_recv_cellular it means that your device does not receive any cellular beacons from the server instance. This could have multiple reasons.
Please check that you can reach the endpoint IP address (use ping <ENDPOINT_IP_ADDR), before contacting Meshmerize (support@meshmerize.net).
However, if the log is empty, it could be that the cellular extension is not configured correctly.
Some of the most common reasons are either the wrong interface set as cellular_iface, the cellular interface not available for webway, or the bridge loop avoidance (bla) status of your device.
Please check them before contacting Meshmerize.
-
wrong cellular iface
Enter
meshmerize optionsto check that thecellular_ifaceis set correctly. -
cellular interface not registered for Meshmerize
Enter
wwctl iface listand check that your cellular interface is listed among the returned interfaces. If your interface is not listed try to set themeshwwaninterface down and up again withifdown meshwwan0followed byifup meshwwan0. If your interface is still missing, try to manually add it withwwctl iface add <IFACE> type udp endpoint <ENDPOINT>. -
BLA follower
Enter
wwctland check that your device is a 'leader'. If it says 'follower' your device is a bla (bridge loop avoidance) follower. The follower can not send UDP packets. The cellular link is a UDP link. Therefore, make sure that all your devices that should send cellular packets are bla leaders.
¶ Disrupted Cellular Connection - MTU
In case you notice that your cellular link experiences high packet loss and pings only get through in bursts, you probably have fragmentation due to packets exceeding the maximum transmission unit (MTU). The MTU describes the maximum of payload bytes a packet frame can have. It needs to respect the maximum allowed frame size that can be transported on the data link layer. Therefore, it has to be small enough that additional bytes (headers + frame check sequence) can be added without exceeding the allowed frame size.
Maximum frame size = largest MTU of all protocols used in the network layer + size of the data link layer headers
The MTU concept can be adapted to letter mail. A compact letter may weigh a maximum of 50 g. For transportation, the letter requires an envelope weighing 4 g and a stamp weighing 0.3 g, for example. These 4.3 g correspond to the size of the security layer headers. This means that the MTU (the maximum content for a compact letter or packet size) is 50 g - 4.3 g = 45.7 g. If you want to send more weight, you have to switch to another protocol (a large letter with more postage) or divide the content into several letters, i.e. fragment it.
Due to the VPN, additional headers are added to the Meshmerize headers. This leads to fragmentation because the frame exceeds the maximum allowed frame size. To avoid fragmentation, the device generating the frames needs to reduce its MTU. To fix this you need to set the MTU of your application device to a lower value (1300 should work). Changing the MTU of your routers interface won't help, because the device it is attached to is generating the packets and needs to reduce its transmission size.