¶ Meshmerize - Quick Tests Guide
This guide leads you through the necessary steps to successfully deploy and test the Meshmerize mesh network. The primary goal is to ping multiple devices from your computer.
To achieve this, the guide will walk you through the following key steps in detail:
- Meshmerize out-of-the-box Test
- Connect to your Meshmerize device
- Install the Meshmerize license
- Set up a simple connection between two Meshmerize devices
- Short introduction on how to configure Meshmerize and general network settings.
Please note that these steps assume that you have already installed MeshmerizeOS on your devices. If you want to know how to install Meshmerize, go to the respective device’s guide installation section.
¶ Quick out-of-the-box test
Let's start with a quick out-of-the-box demonstration of Meshmerize by connecting your computer to the internet. This requires at least two Meshmerize-enabled devices and a running DHCP server, for instance from your home or office router that you already use. Power on both Meshmerize devices (nodes) and connect the LAN port of your first node with one of the Ethernet ports of your office/home network. Next, connect the LAN port of the second node to your computer. Your setup should look as depicted in the graphic.
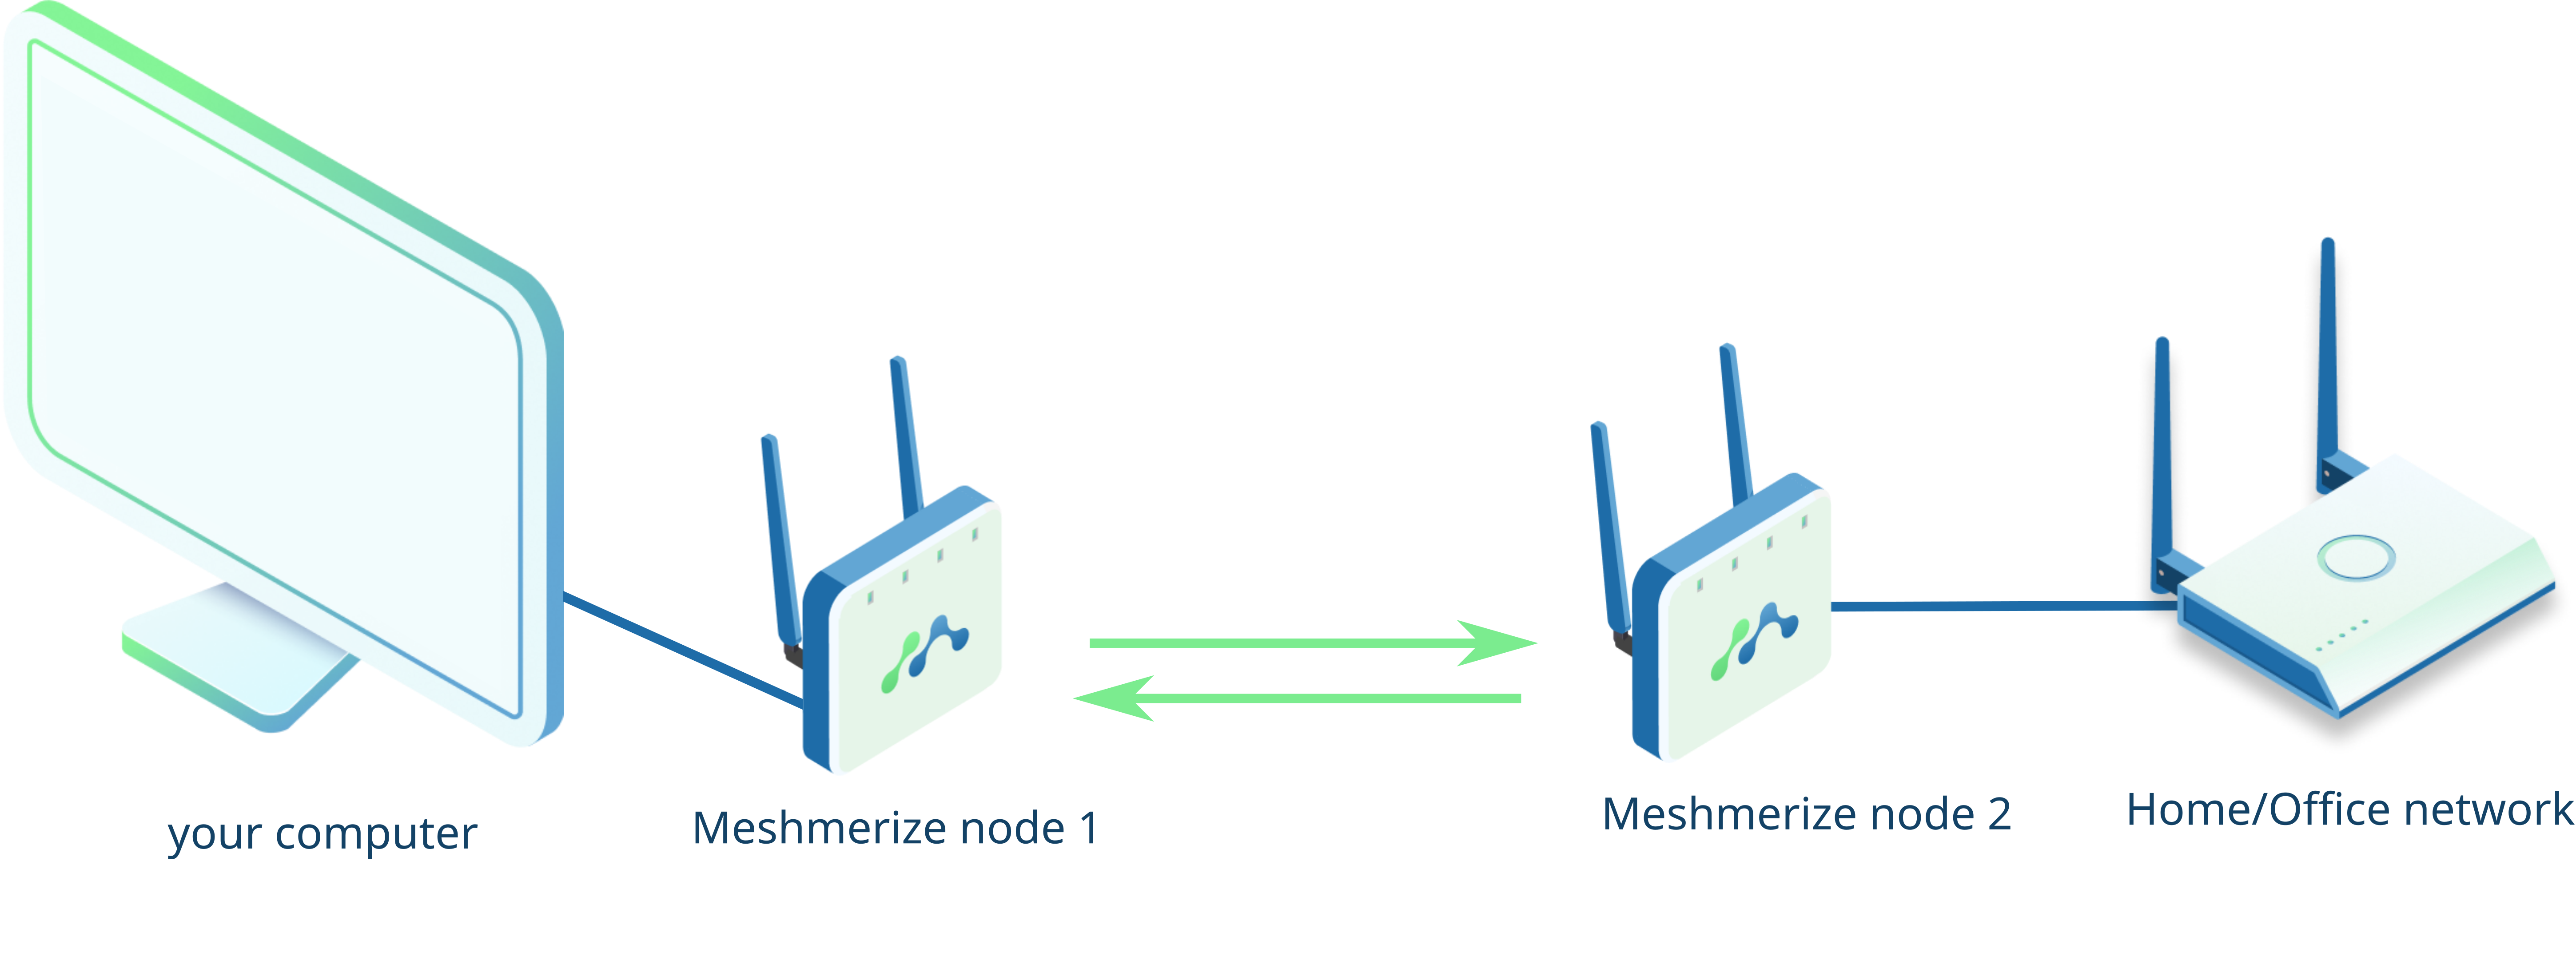
Your computer will automatically establish a connection using the DHCP server of your office network to join the network. You should now be connected to the internet through the Meshmerize network, and you can freely move around while enjoying seamless connectivity. To test your internet connectivity, you can use your preferred terminal to ping meshmerize.net. Optionally, you can turn on a third Meshmerize device (or more) and place it slightly at a distance to enjoy the range extension of your network.
Voila! You have a self-healing mesh network.
The mesh network runs in Trial Mode without restrictions for 30 minutes after powering up the devices. Please follow the Next Steps guide on how to install a license if you want to set up a persistent Meshmerize network.
¶ Personalize your mesh network
By default, the mesh network on all devices is configured with the same factory-default SSID and password. This is why they were able to connect with each other seamlessly in the previous step. Let’s change that, and set up your private mesh network. To do so, we will connect to each node individually, and:
- Activate the Meshmerize license for the device
- Update their mesh SSID, password config
- Point them to your private Hive server to manage them remotely and centrally
Repeat the following steps for each device that you would like to configure with Meshmerize.
¶ Connect to the node using their respective management-hotspot
Every MeshmerizeOS installed node spawns a WiFi hotspot by default, that allows us to connect to it and configure it easily during setup. Once the node is powered on, you will see a new WiFi network pop up with the SSID: MM-Mgt-xxxx . The xxxx refers to the last 4 digits of the MAC address of the device. Connect to that network with your computer or laptop. The WiFi password of the management network is ‘youmoveweconnect’.
In case you can not identify the MAC addresses of your devices, please switch on only one of your devices to make sure that you connect to the right one.
Once you are connected, visit the device configuration tool of the node by going to http://10.20.30.1 from a browser.
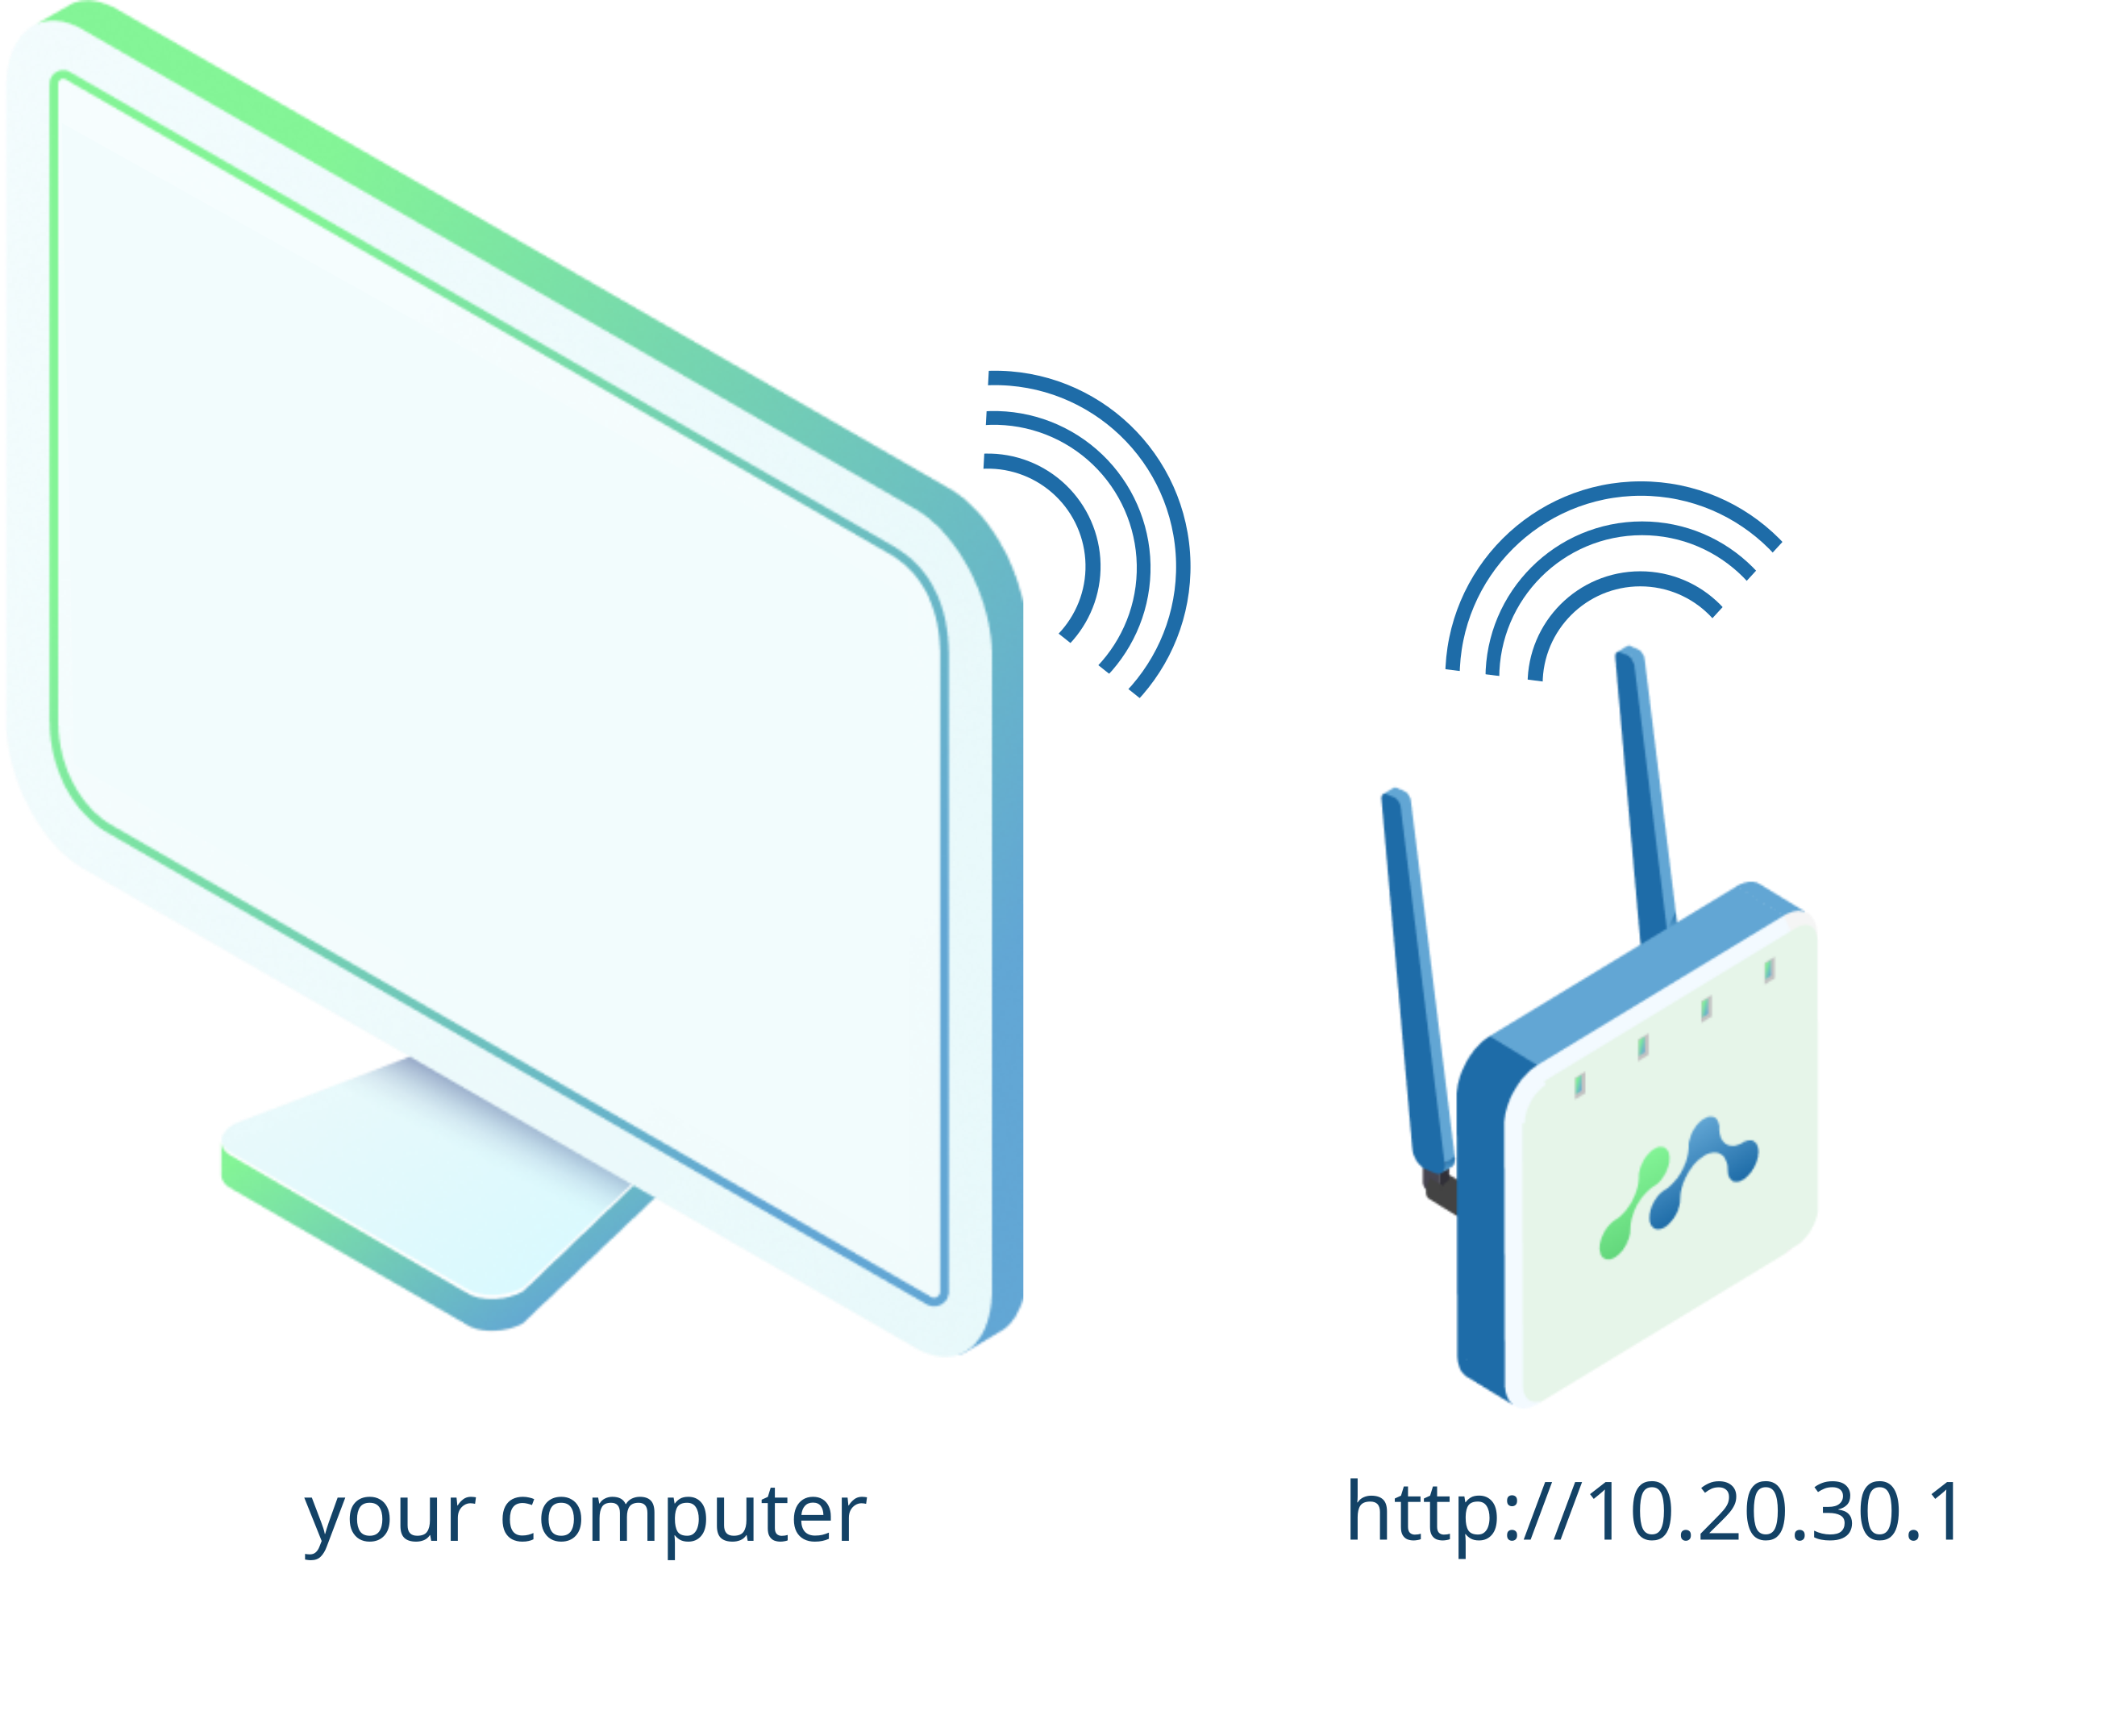
You should be greeted with an authentication popup. By default, the user is set to root and there is no password configured. Proceed by clicking the Login button.
Now you should be able to see the graphical UI (OpenWRT LuCI web interface) of your Meshmerize device, which informs you about the device model, system and, network status.
To get detailed information and configuration options for system and network settings, you can go to the OpenWRT documentation to find examples and instructions on how to change the configuration of your device.
¶ Activate Meshmerize License
Every device requires to have a license file installed that allows the usage of Meshmerize beyond the trial period. Without a valid license file, Meshmerize will not operate after the trial expires.
To view the current license status of your device, or to install a license, navigate to “Network” -> “Meshmerize” and select the “License” tab.
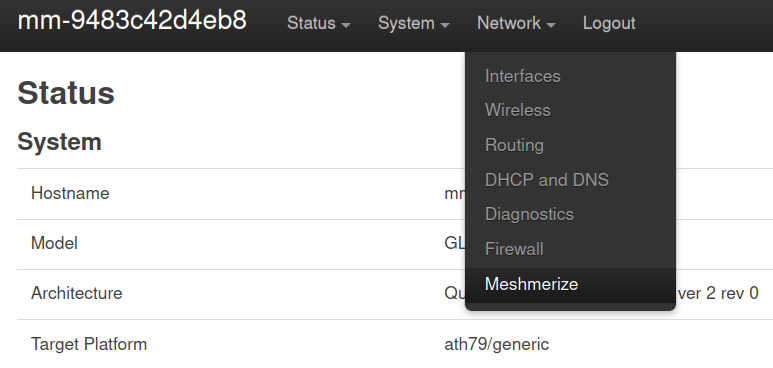
This page shows you the current license status of Meshmerize and gives you two options to install a new license.
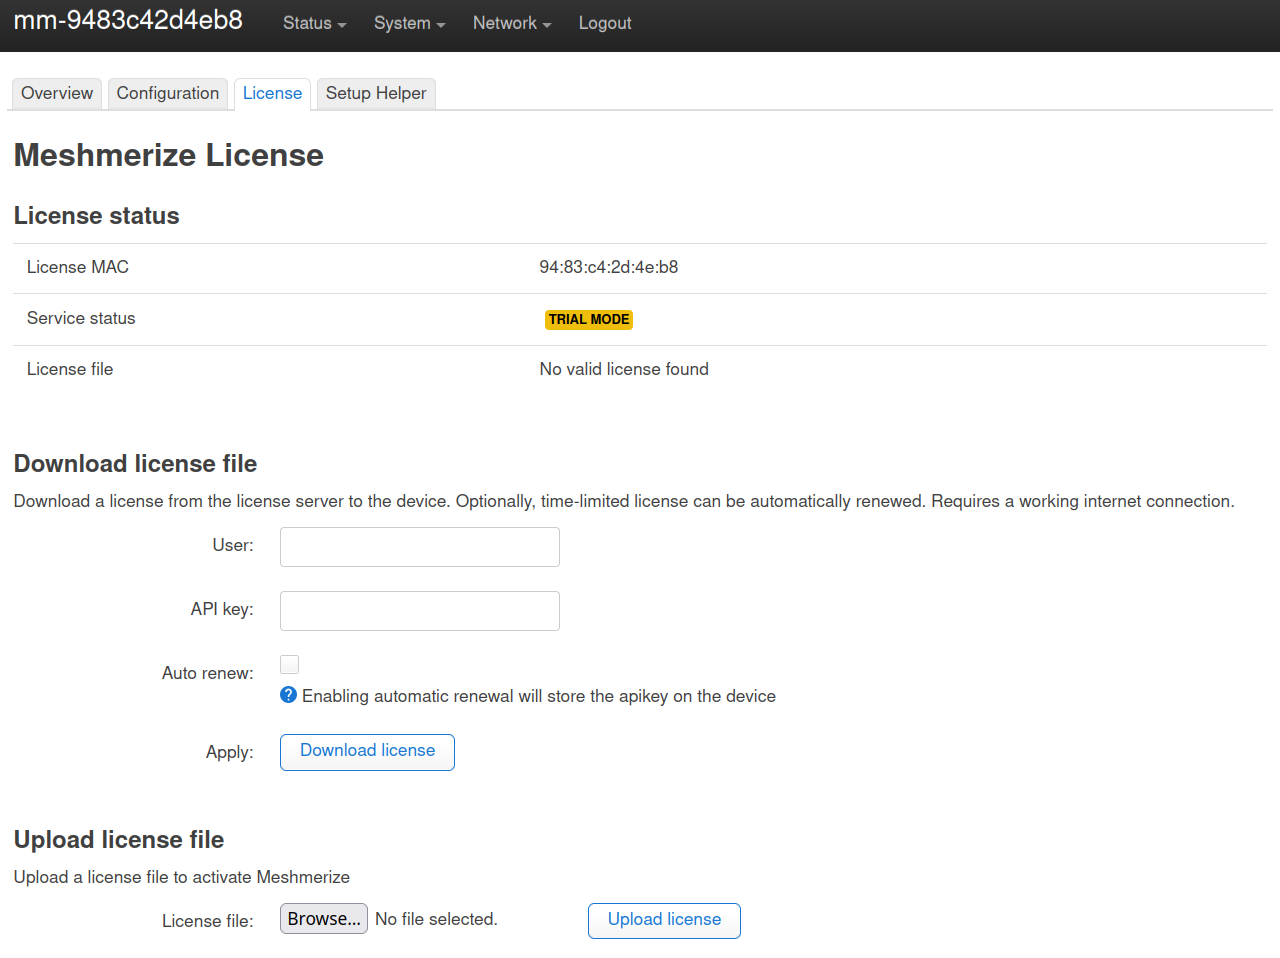
After purchasing individual Meshmerize licenses the respective license files for installation will be provided by us. You only need to provide the MAC addresses of your devices. After that, you will receive a license file that you can upload to the device using the "Upload license file" section.
Alternatively, if your organization is are already entitled to a number of activations, you can generate the license file by yourself directly on your device. This requires the device to have access to the internet. Enter the user and API key credentials provided to you and download the license file from our server. The “Auto renew” option allows you to store the credentials on the device so that it can request a new license automatically once the original expires.
Once a proper license file is uploaded, the “Service status” should change to “Licensed”.
¶ (optional) Update the mesh WiFi config
To change the WiFi configuration for your mesh network, navigate to “Network”→ “Wireless” and edit the Wireless entry with the SSID/MeshID "meshmerize". You can now change WiFi settings such as the frequency band, the channel or, the channel width.
Please note that if you change the SSID or the WiFi settings of the mesh, it must be changed on all devices that you intend to be a part of the mesh network. Inconsistent settings over any of your devices will prevent the setup of a common mesh network. In case you connected to the device you are currently modifying over the mesh network this might also lead to a disconnect of your connection to the device. You will be able to reach the differently configured device once a second device has the same configuration.
¶ (optional) Connect the device to Hive
Hive is a cloud-first network management tool that allows you to manage and visualize your entire Meshmerize network in a centralized manner.
Navigate to “Network” -> “Meshmerize” and switch from the “Overview” tab to “Configuration”. The "Management Worker" section controls the connection to Hive. To use Hive, enable the Hive client service to start monitoring your mesh devices. Uncheck the disabled selection and enter your personal Hive server's address (e.g. https://mynetwork.hive.meshmerize.net) and port to connect your device. If you don’t know what your Hive address is, contact support@meshmerize.net.
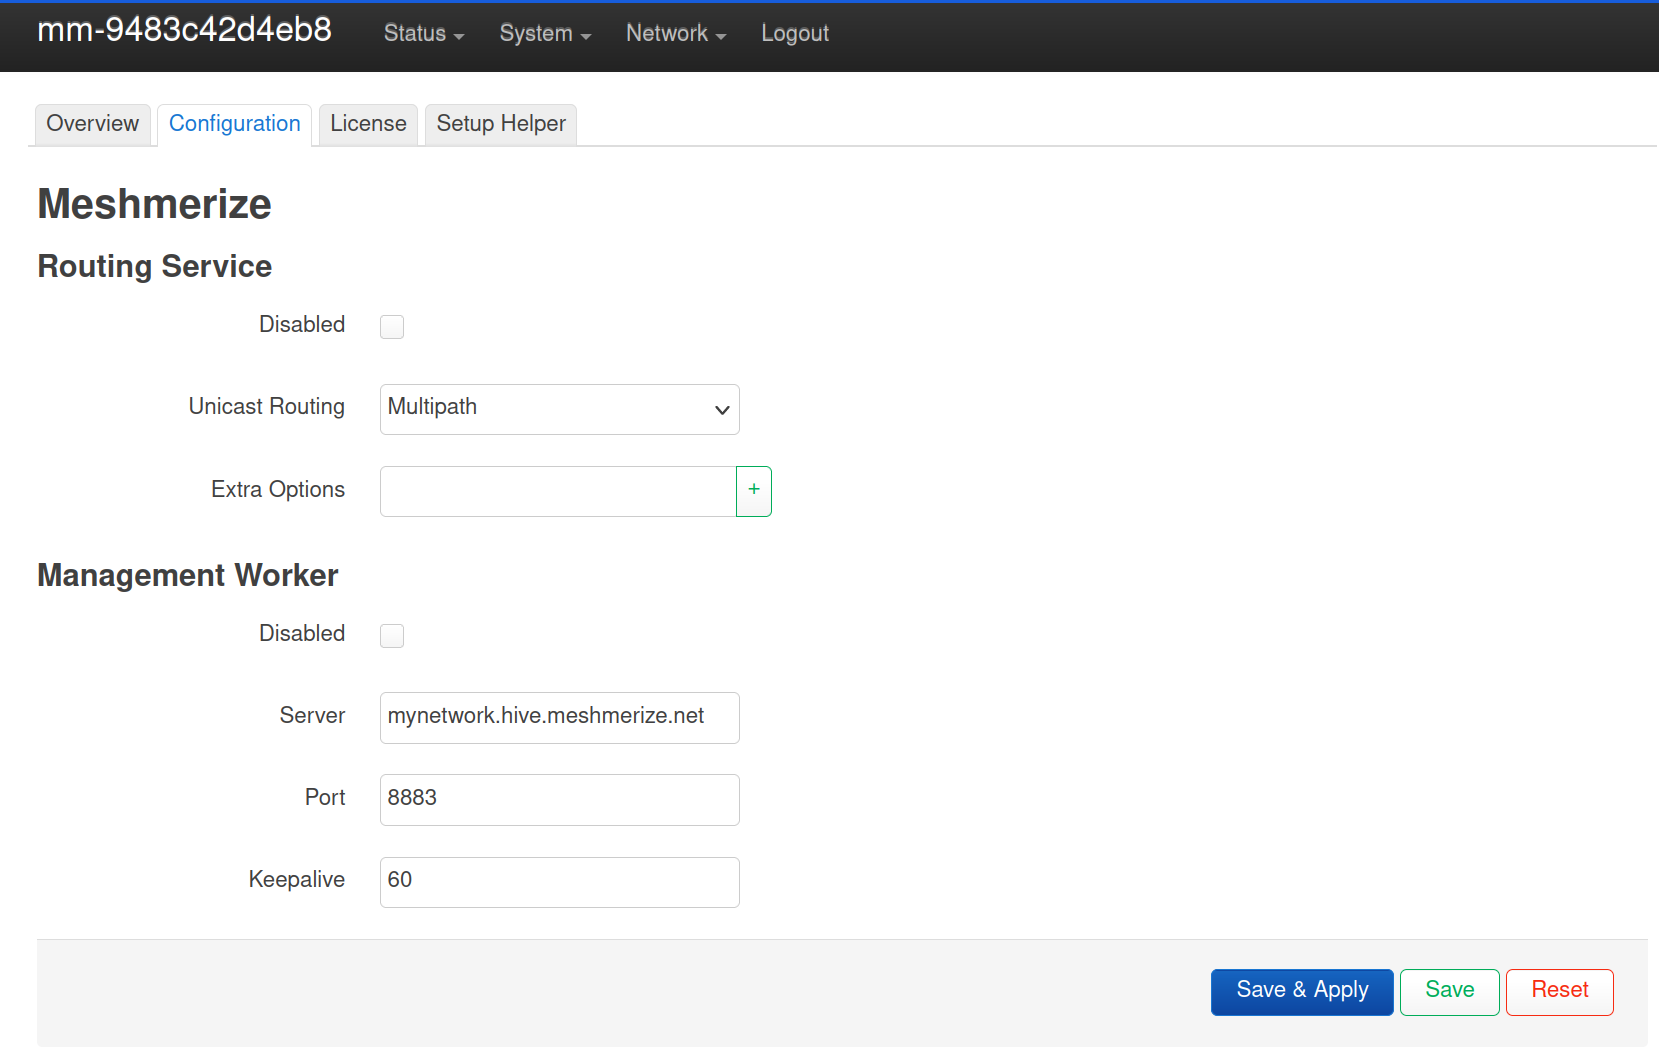
Do not forget to ‘Save & Apply’ in order to apply your changes.
Further instructions on how to proceed with Hive can be taken from the Hive User Guide.
¶ Testing the Mesh - Take Meshmerize for a Spin
So you have a bunch of fully configured and licensed Meshmerize nodes. What now? Let’s do some basic mesh tests that will make you more familiar with the network.
For the basic physical device setup, you need two computers and at least two Meshmerize nodes. Each computer should be connected to one of the nodes, as depicted in the graphic below. Make sure to connect the devices via their LAN ports, otherwise, it will require additional configuration.
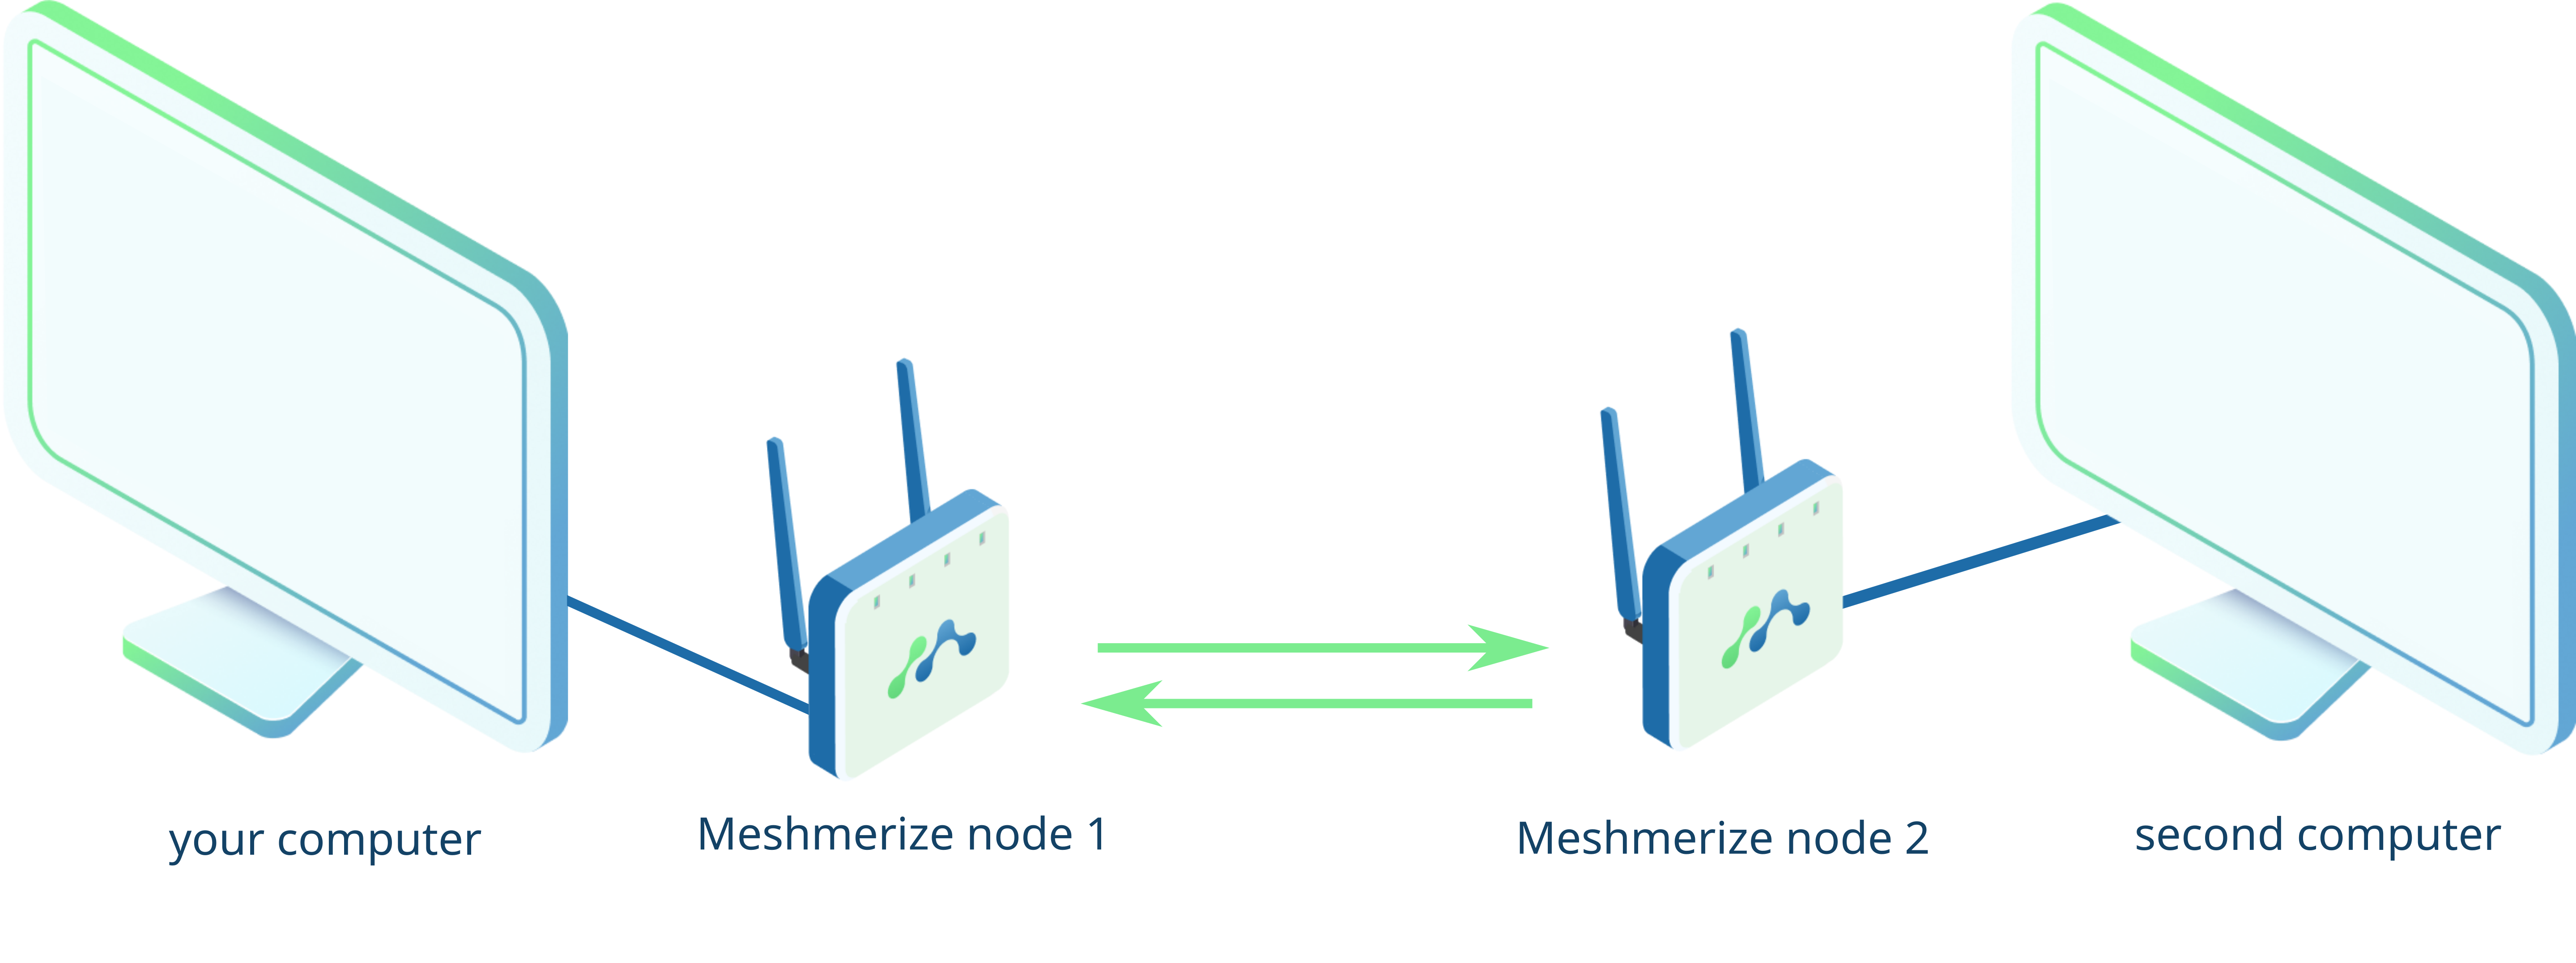
The objective of this test is to send a device-to-device ping from one computer to the other through the mesh network.
To allow your computers to ping each other, they need to have IP addresses.
By default, MeshmerizeOS is configured as a DHCP client, which means it does not assign IP addresses to your computers. You have three options for assigning IP addresses to your computers.
The first option is to assign the IP addresses manually. You can choose unique static IP addresses within the same network range for both computers. Please look at the following guides on how to assign static IP addresses to your computer (Windows, MacOS, Linux). Please note that while the online guide may demonstrate how to assign a static IP to your WiFi interface, it is important to assign the static IP to the Ethernet interface of your computer.
The second option involves configuring one of the Meshmerize nodes in the mesh network to act as a DHCP server. This means the node will automatically assign IP addresses to your computers. Note that you will need to set up the DHCP server functionality on the selected node. Be sure to set up ONLY one node as a DHCP server to avoid any conflicts.
The third option requires adding a third Meshmerize node to your setup. Connect this third node to your office network as described in the Test Meshmerize Out-of-the-box guide. By connecting to your office network’s DHCP server, your computers will obtain IP addresses automatically, just like any other device on your office network.
Once the IP addresses are assigned, note these down and proceed with testing the ping. Open your favorite terminal or command prompt on one of the computers. Then, enter the ping command, followed by the IP address of the other computer - the one you wish to ping. This command will send a ping request from one computer to the other, allowing you to check if they are successfully communicating via the mesh network.
For example on a Linux machine, a successful ping response of ping 169.254.0.254 would look like this:
PING 169.254.0.254 (169.254.0.254) 56(84) bytes of data.
64 bytes from 169.254.0.254: icmp_seq=1 ttl=64 time=2.44 ms
64 bytes from 169.254.0.254: icmp_seq=2 ttl=64 time=0.969 ms
64 bytes from 169.254.0.254: icmp_seq=3 ttl=64 time=1.31 ms
64 bytes from 169.254.0.254: icmp_seq=4 ttl=64 time=0.903 ms
64 bytes from 169.254.0.254: icmp_seq=5 ttl=64 time=1.01 ms
--- 169.254.0.254 ping statistics ---
5 packets transmitted, 5 received, 0% packet loss, time 4006ms That's it! Now you have multiple devices using Meshmerize to talk to each other!
To monitor the connections of multiple Meshmerize devices within the network you can use the Meshmerize tab of the graphical interface. It shows the direct links the device has to other Meshmerize devices. Navigate to the Overview tab in “Network” -> “Meshmerize” to confirm that the devices have a mesh connection. The "Links" sub-tab displays information about all directly connected devices, while the "Routes" sub-tab indicates to which mesh devices a route can be found over several individual links through the mesh network. Note that Meshmerize devices are identified through their MAC address, not their IP address. You can find the MAC address identifier for each device on the Overview page.
¶ Further Configuration
MeshmerizeOS is built on top of OpenWRT. Therefore, you can use the same configuration options and instructions provided by the OpenWRT documentation. You could use it to set up advanced configurations like firewalls, DHCP servers, VLANs, etc.
¶ Setting up a DHCP server on the Meshmerize network
You can set up one of your Meshmerize devices as a DHCP server. This comes in handy when you plan a local deployment without a DHCP server already present, to assign IP addresses to the Meshmerize devices within your network. Please make sure to have at most one device in the network to be configured as a DHCP server at one time.
To achieve this, you can connect to the management WiFi of the Meshmerize device you want to become your DHCP server. Access the GUI and go to “Network” -> “Interfaces”.
Now you should see a list of existing interfaces, e.g. “lan”, “lan_dhcp”, etc.
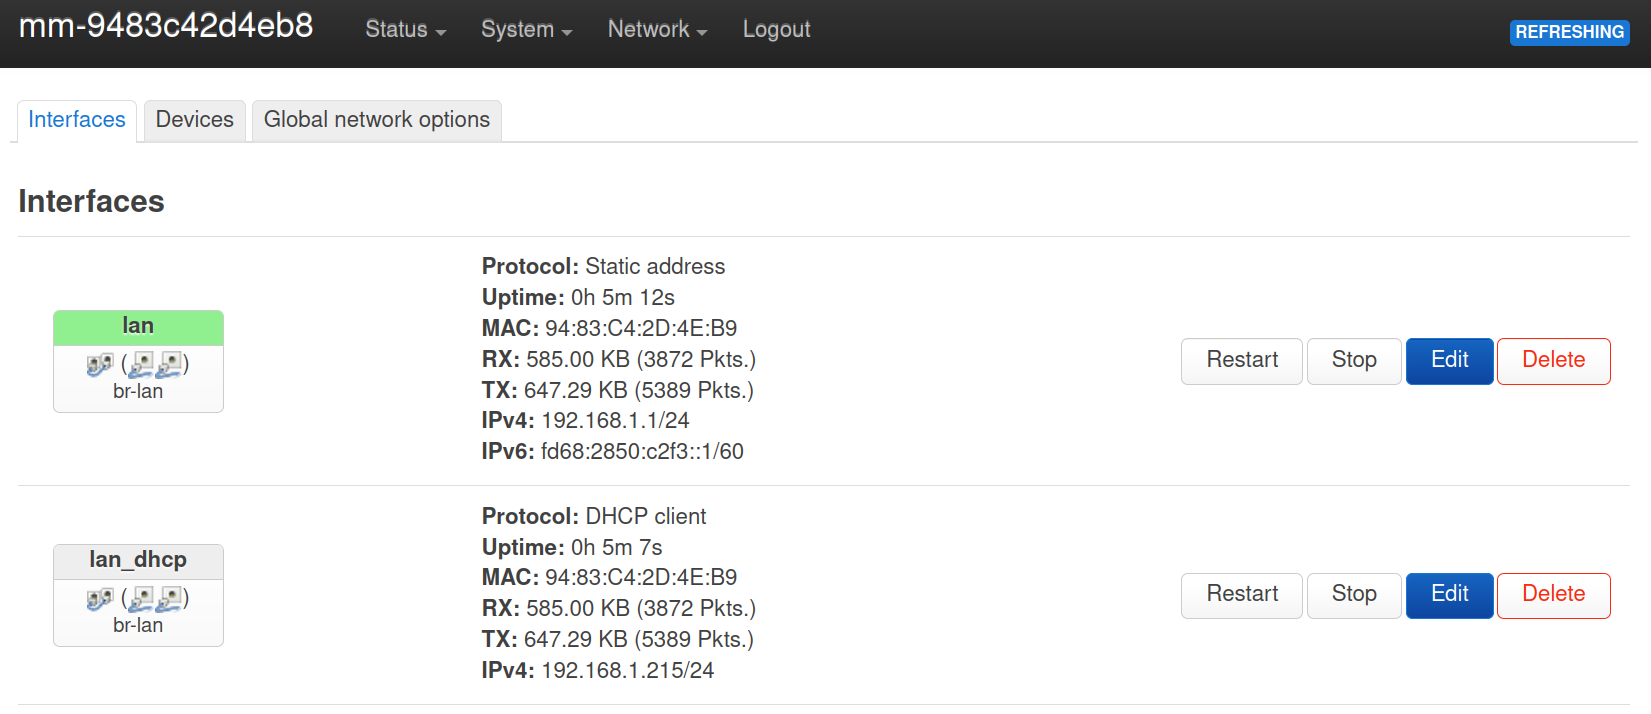
We need to change the “lan_dhcp” interface to act as a DHCP server. Therefore, click on “Edit” next to the “lan_dhcp” interface. You should see the following setup menu:
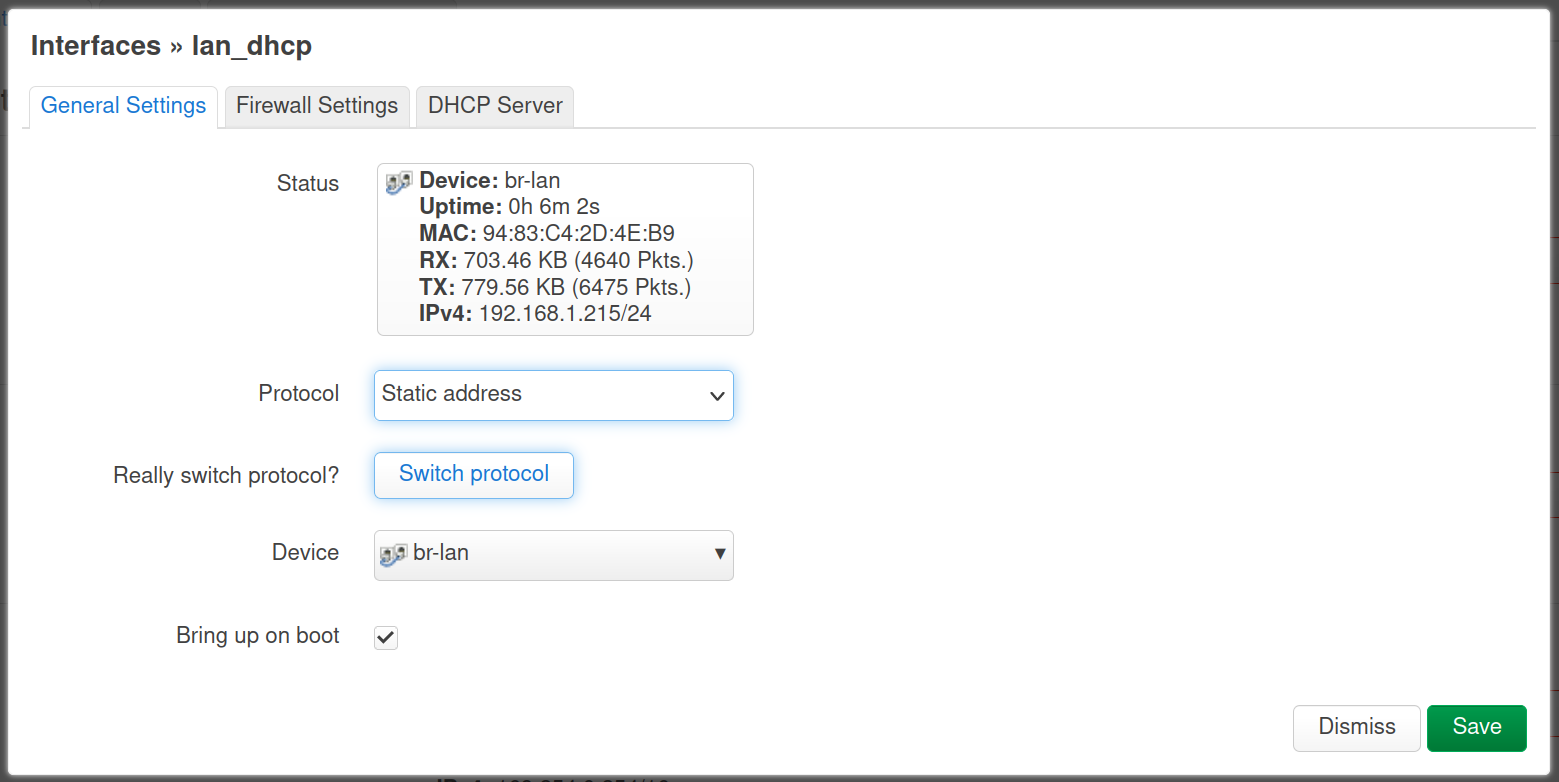
Change the “Protocol” from “DHCP client” to “Static address” and click on the “Switch protocol” button to get to the next configuration step. After confirming the protocol change, you will be asked to specify the static IP address and subnet mask.
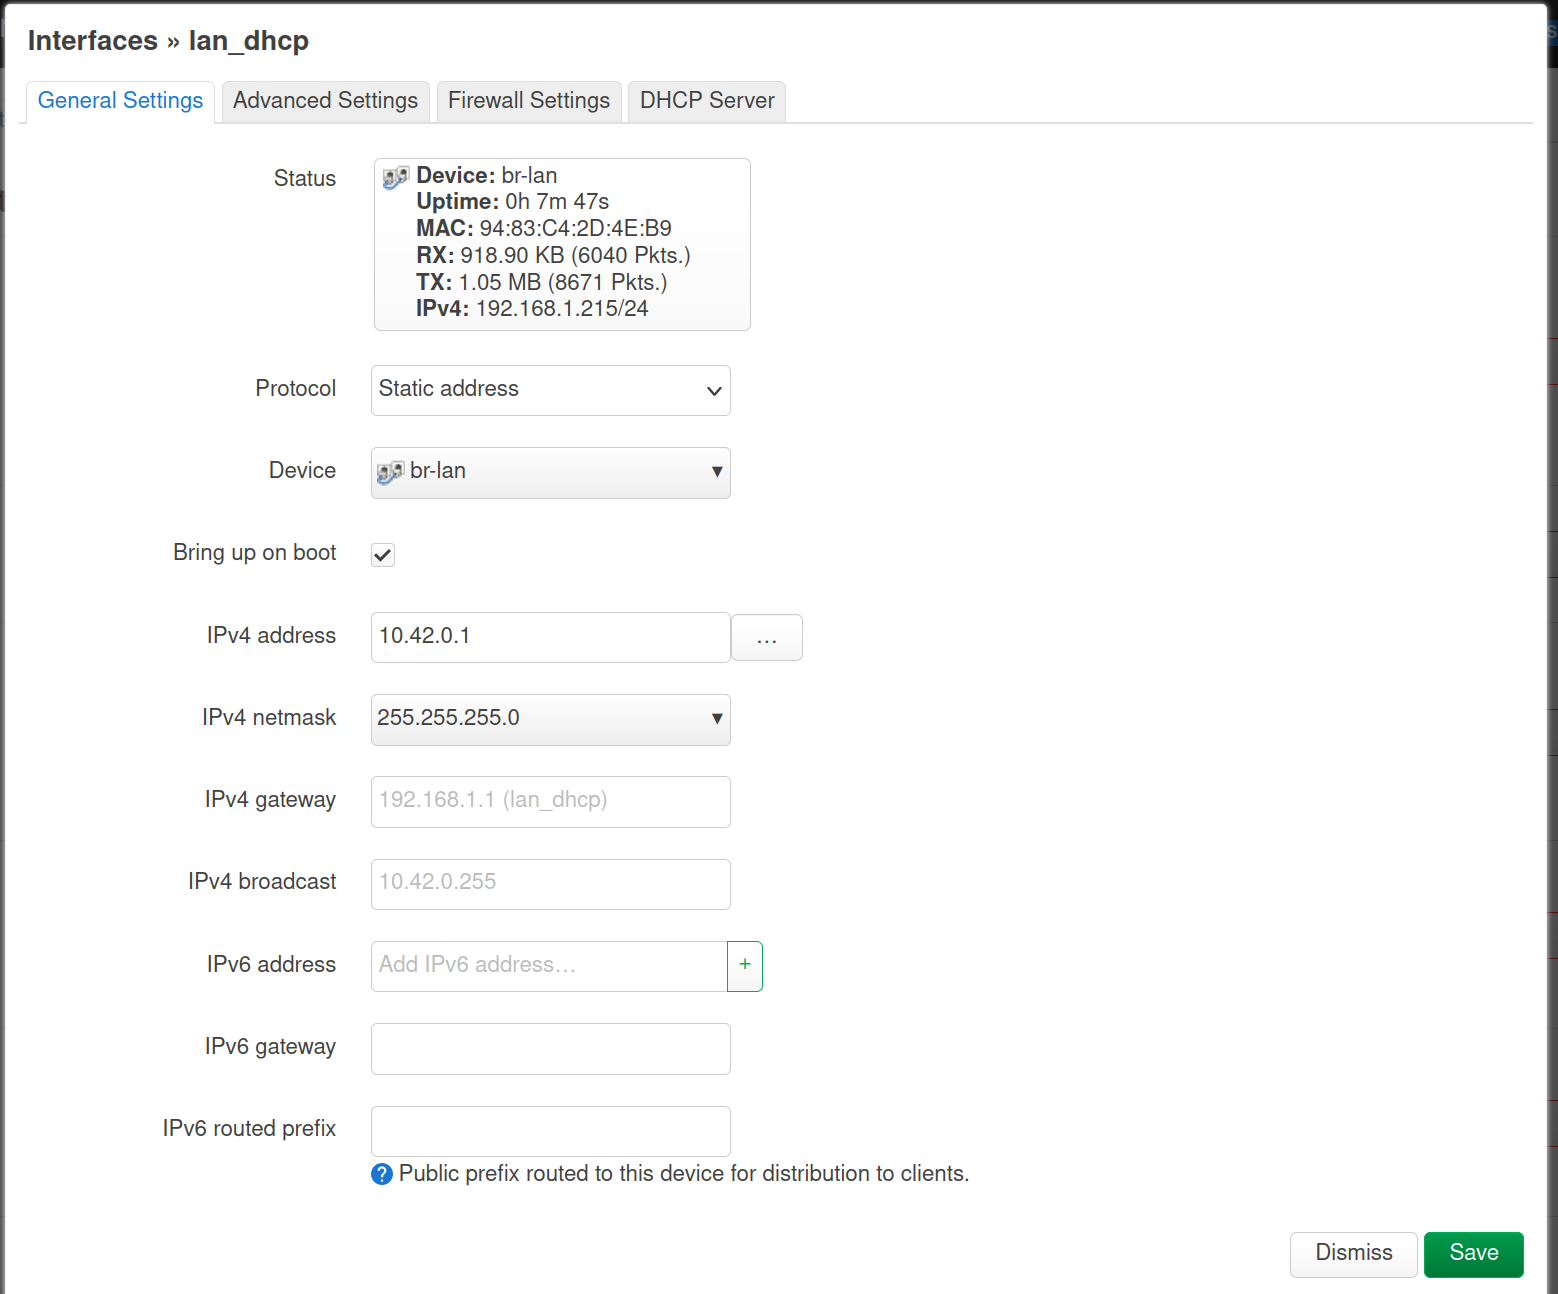
In this example, we assign the IP address 10.42.0.1, but you are free to choose whatever IP address you want. As the subnet mask “IPv4 netmask”, select “255.255.255.0”.
The remaining configurations can be kept as they are. Now, we have a static IP assigned to the “lan_dhcp” interface, but we still need to add the DHCP server functionality. Therefore, go to the “DHCP Server” tab and click on “Set up DHCP Server”.

Please note that the “Ignore interface” checkbox has to be unchecked. If that is not already the case, please uncheck it. Apart from that, you can leave the settings and confirm your changes with “Save”.
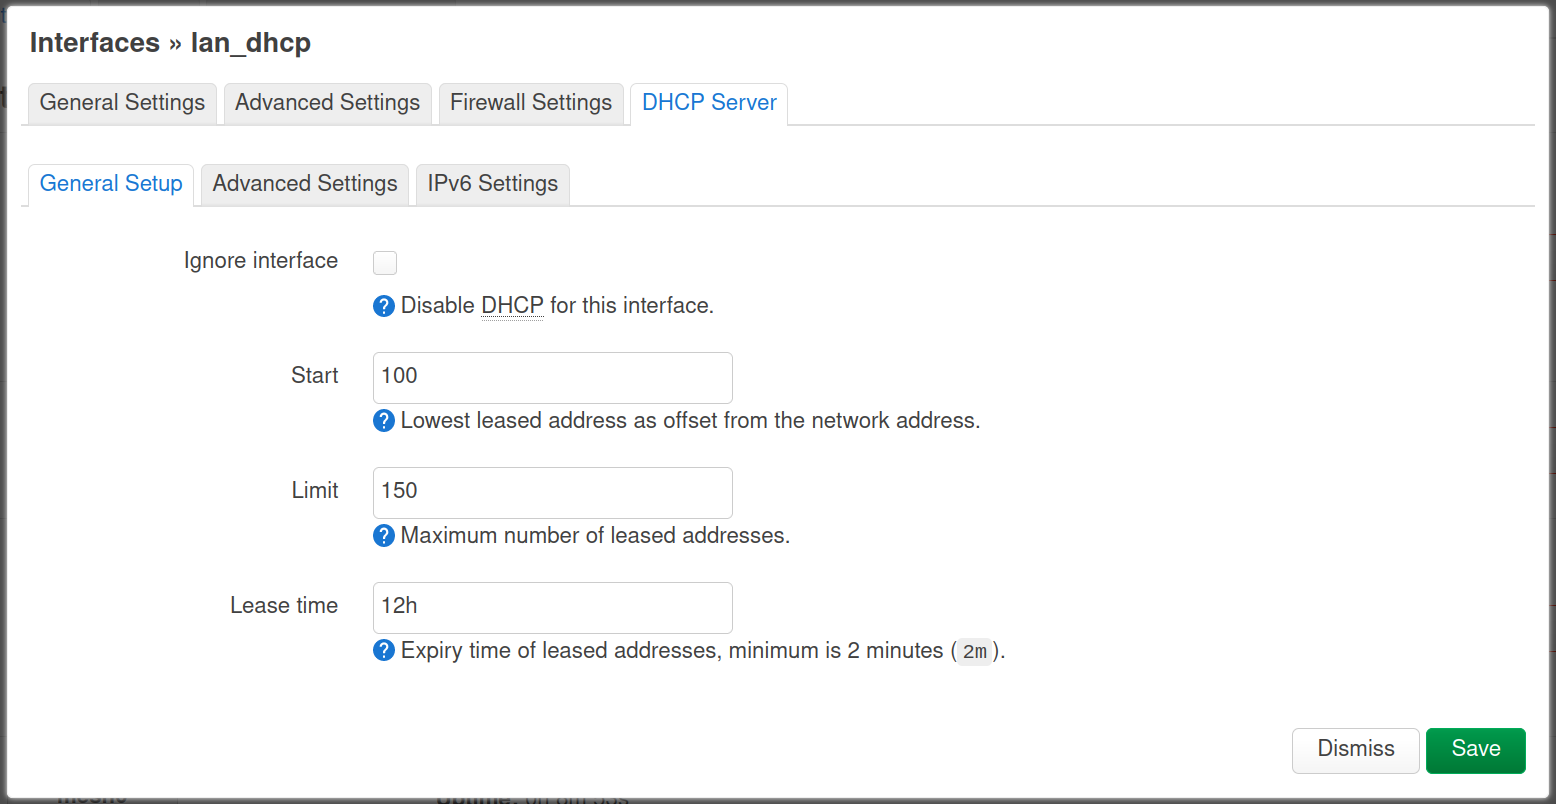
That’s it! Now you have your own DHCP server that will take care of assigning IP addresses to all the devices within your network.
¶ Disable the management WiFi
At this point, you have successfully configured your devices, and we have introduced new methods to access the GUI. As a result, you do not need the management WiFi anymore. You have the option to disable or even remove it from within the GUI. Here is what you need to do:
Navigate to “Network” -> ”Wireless”. A list of active wireless networks will be displayed.

Look for the network labeled with “SSID: MM-Mgt-xxxx”. To disable or delete it, simply click on “Disable”.
Now, you will no longer be able to access your device via the management WiFi, you can enable it at any point in the future if needed.
¶ Troubleshooting
¶ Which Ethernet port is the LAN port?
As Meshmerize is available for many different hardware platforms with different out-of-the-box physical ports and software configurations, not all Ethernet ports are set up as a LAN ports. Follow the labeling on your device to see if it already indicates one of the available ports as LAN connection. In case there is no explicit LAN label printed on the device, connect to any generically labeled ports.
For further information and troubleshooting, please refer to your specific device's page at https://docs.meshmerize.net.